Outlook Add-in
The PhishSpot Outlook add-in puts a Report Phishing button on every email you read. One click sends the message (body, headers, attachments) to your PhishSpot account’s Reported Messages list. No forwarding to a special address, no manual copy-paste.
This page is for end users. If you’re an admin rolling the add-in out to a whole organisation, see Outlook Add-in: Central Deployment.
20.1 What you need
Section titled “20.1 What you need”- Outlook on the web, Outlook for Windows or Mac, or the new Outlook for Windows.
- A PhishSpot Contact account at your organisation (your IT team can create one for you if you don’t have one).
- A few minutes to install the add-in and pair it.
The add-in does not work on Outlook for iOS / Android in v1.
20.2 Install the add-in
Section titled “20.2 Install the add-in”- Download the sideload package: phishspot-outlook-sideload-v1.1.0.zip.
- Unzip it. You’ll get a
manifest.xml, a folder of icons, and aREADME.mdwith click-by-click instructions for each Outlook variant. - In Outlook, open Get Add-ins → My add-ins → Add a custom add-in → Add from File… and pick
manifest.xml. - Confirm the install dialog. The Report Phishing button appears on the message-read ribbon.
If your IT team has already deployed the add-in centrally for everyone, skip the install — you’ll see the button automatically.
20.3 Pair the add-in (one-time)
Section titled “20.3 Pair the add-in (one-time)”The first time you click Report Phishing, the add-in shows a 6-digit code in the PhishSpot task pane on the right side of Outlook:

-
Open
https://platform.phishspot.com/guest/activation/newin a browser (the here link in the task pane will take you straight there). Once signed in, you’ll see the Connect your Outlook add-in page: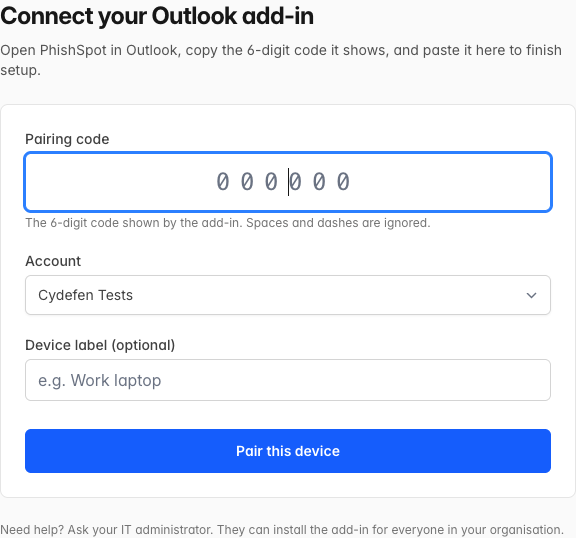
-
Sign in with the same email your IT team registered for PhishSpot.
-
Type or paste the 6-digit code shown in the task pane.
-
Pick which account you’re pairing with (if you belong to more than one), optionally give the device a name, then click Pair this device.
The add-in detects the pairing within a few seconds and switches to its normal view, with a big Report suspicious message button and your organisation name underneath:

The pairing is per-device — if you have Outlook on two computers, you’ll pair each one separately. Optionally name the device (e.g. “Work laptop”, “Home iMac”) so admins can tell them apart on the API tokens screen.
20.4 Report a suspicious email
Section titled “20.4 Report a suspicious email”- Open the email you suspect is phishing.
- Click Report suspicious message in the task pane.
- The task pane briefly shows “Reporting…” while the message is sent.
- A thank-you screen confirms the report:

Click Close to dismiss the task pane.
The report appears in your organisation’s Reported Messages list. Your security team will review it.
20.5 What gets sent
Section titled “20.5 What gets sent”- The sender’s email address and display name
- The subject and the message body (HTML + plain text)
- The full internet headers
- All file attachments
- A timestamp and the message’s Internet Message ID (for deduplication)
The bearer token the add-in uses is scoped to reported_messages:create only. The add-in cannot read, modify, or send any of your other mail.
20.6 The “Update available” banner
Section titled “20.6 The “Update available” banner”Each time you click the button the add-in checks its version against the server. Two outcomes:
- An update is available — soft banner; you can still report. Ask your IT team to push the new version when convenient.
- Update required — hard block; the button is hidden until the add-in is updated. This happens only when an old version is incompatible with a server change (rare).
20.7 Unpair / sign out
Section titled “20.7 Unpair / sign out”In the paired card, click Unpair this device. The token is removed from your Outlook. Your IT team can additionally revoke the token from the PhishSpot admin under API Tokens.